Deploy WordPress with Nginx and Let’s Encrypt Certbot (SSL)

WordPress is a widely used web content management system (CMS) originally designed for blogging but now supports various types of web content. It allows users to create and manage websites, blogs, forums, media galleries, e-commerce stores, and more.
WordPress is written in PHP. So, we can deploy it easily using Nginx, the same way as we deploy another PHP application.
And we will also protect our WordPress traffic data by using SSL.
Here we will see how to deploy WordPress on our own with Nginx and SSL to our server:
1. Download WordPress to Your Server
The first thing to do of course is to put the files needed to your server. You can download it directly from the WordPress official website https://wordpress.org/download or you can run this command to download it from a terminal:
wget https://wordpress.org/latest.zip
This command will download the latest WordPress version files to your server. I recommend using the latest version so if there’s some issue with security or the feature before, it will be addressed.
The file is using zip extension, so let’s unzip the files first:
unzip latest.zip
And put it to /var/www directory:
sudo mv wordpress /var/www/wordpress
Because Nginx will use www-data user and group to access the files, we need to change the owner of the WordPress files to www-data:
sudo chown -R www-data:www-data /var/www/wordpress
Now, our WordPress files are ready to be served and accessed by Nginx.
2. Create Our Nginx Configuration
If we want Nginx to be able to find and serve our website to the users, we need to create a configuration for our website.
I’m not using a real domain for this tutorial, so if you have your own domain, you can use that for this tutorial. Or you can buy it from a domain provider on the internet, and there are so many domain providers available.
I usually copy the configuration from the default configuration from Nginx. So I will do it with this command:
sudo cp /etc/nginx/sites-available/default /etc/nginx/sites-available/wordpress
And let’s change the content of /etc/nginx/sites-available/wordpress into this:
server {
        listen 80;
        listen [::]:80;

        # SSL configuration
        #
        # listen 443 ssl default_server;
        # listen [::]:443 ssl default_server;
        #
        # Note: You should disable gzip for SSL traffic.
        # See: https://bugs.debian.org/773332
        #
        # Read up on ssl_ciphers to ensure a secure configuration.
        # See: https://bugs.debian.org/765782
        #
        # Self signed certs generated by the ssl-cert package
        # Don't use them in a production server!
        #
        # include snippets/snakeoil.conf;

        root /var/www/wordpress;

        # Add index.php to the list if you are using PHP
        index index.html index.htm index.nginx-debian.html index.php;

        server_name your-domain.com;

        location / {
                # First attempt to serve request as file, then
                # as directory, then fall back to displaying a 404.
                try_files $uri $uri/ /index.php?$query_string;
        }

        # pass PHP scripts to FastCGI server
        #
        #location ~ \.php$ {
        #       include snippets/fastcgi-php.conf;
        #
        #       # With php-fpm (or other unix sockets):
                fastcgi_pass unix:/run/php/php8.1-fpm.sock;
        #       # With php-cgi (or other tcp sockets):
        #       fastcgi_pass 127.0.0.1:9000;
        #}

        # deny access to .htaccess files, if Apache's document root
        # concurs with nginx's one
        #
        #location ~ /\.ht {
        #       deny all;
        #}
}
In this config, we are using your-domain.com as the domain, you can change it to your own domain.
And I’m also using php-fpm 8.1 version. You still can use version 7.4 or as stated on their website https://wordpress.org/about/requirements/ .
Then let’s check our Nginx configuration with this command:
sudo nginx -t
And when you get this message:

That means there’s no misconfiguration on your Nginx file. But if there’s one, you need to fix it first.
Then let’s restart our Nginx service so our configuration will be applied with this command:
sudo systemctl restart nginx
And our Nginx configuration is finished.
3. Setup Database Configuration
Like other web applications, of course, WordPress needs a database too. So let’s set up the database for our application.
Change file /var/www/wordpress/wp-config-sample.php file to /var/www/wordpress/wp-config.php so WordPress can read the config that we will write to the file.
sudo mv /var/www/wordpress/wp-config-sample.php /var/www/wordpress/wp-config.php
Fill these fields with your database configuration.

If you don’t have any database installed, you can install MySQL database first on your server like in this link. Then you can fill the configuration in the file with the MySQL configuration that you just created.
4. Protect Your WordPress Traffic With Let’s Encrypt Certbot
We can protect our site with SSL. To be able to do this, we need an application named Certbot that will help us set up an SSL for our site.
But before doing that, we need to install Certbot on our website. We can install it using snapd. So let’s install it first:
sudo apt install snapd

sudo snap install core; sudo snap refresh core
And finally, install Certbot:
sudo snap install --classic certbot
And create a symbolic link so we can run Certbot everywhere:
sudo ln -s /snap/bin/certbot /usr/bin/certbot
After we have Certbot, let’s apply it to our WordPress site with this command:
sudo certbot --nginx -d your-domain.com
If it shows a success message, then your WordPress site is protected by SSL successfully.
5. Setup Your WordPress Website
Then, you can set up your WordPress app from your browser by opening this link:
http://example.com/wp-admin/install.php
And follow the instructions that are available there.
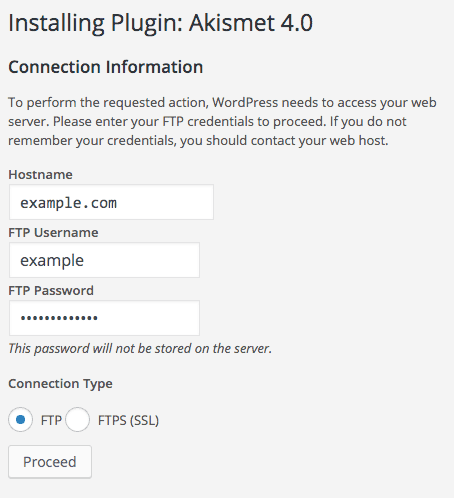
6. Setup FTP Server Configuration
When you try to install a plugin like in this menu:

You will across a menu that requires you to insert an FTP configuration like this:

So, you need to set up an FTP server on your server. You can check how to do it here.
Don’t forget to include the FTP server username in the www-data group so it can put and modify files there using this command:
sudo usermod -a -G www-data ftpuserAnd now, you can use your WordPress app fully, yay!
If you have any questions, don’t hesitate to comment or contact me on LinkedIn, thank you!
Amanda
You rreally make it seem so easy with your presentation but I fnd this matter to be actually
something that I think I would never understand. It seems too complicated and extremely broad for me.
I am looking forward for your next post, I will try to get the hang of it!
Here is my webpage https://Vavada.Widezone.Net