
Crafting Your Own WordPress Widget Plugin: A Step-by-Step Guide
Want to make a custom widget for your blog that works just how you like? If you’re not sure how to start, here’s a simple guide on making your own WordPress widget plugin.
The widget we’ll create is a simple one that ranks posts on our WordPress website. The ranking will be based on the number of views each post has, with the most viewed posts appearing first. Of course, we will limit the display to the top 10 posts.
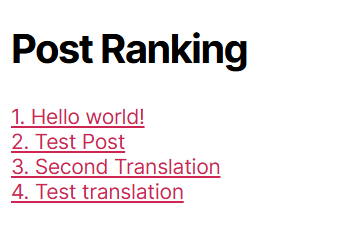
What Our Widget Will Looks Like
It will be a simple widget that shows 10 most visited post. The widget will be like this.
Create the Project Directory
The first step to this tutorial is to create the directory. Usually, WordPress plugin files will be placed on directory app/public/wp-content/plugins, and because the widget that we’ll create is a simple one so let’s create the directory like this:
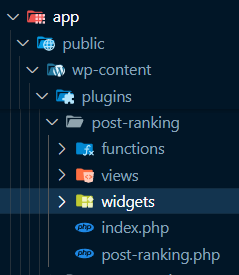
I’ll name the plugin as Post Ranking. The functions for each directory will be like this:
functions: A directory for function that will be called many times.views: A directory for the view (HTML) of the widget will be placed.widgets: A directory for the widget class will be placed.
And aside from that, we also have have index.php and post-ranking.php file. The index.php file is for blocks user for directly accessing your directories. And post-ranking.php is for the main class for the plugin. I named the plugin as Post Ranking, but you can use another name for this plugin.
Work On Our Plugin’s Main Class Base Code
At post-ranking.php file, let’s fill it with template and main class for our plugin like this.
<?php

/**
 * Plugin Name: Post Ranking
 * Plugin URI: https://www.wordpress.org/post-ranking
 * Description: My plugin's description
 * Version: 1.0
 * Requires at least: 5.6
 * Requires PHP: 7.0
 * Author: Yohan Ardiansyah
 * Author URI: https://www.codigowp.net
 * License: GPL v2 or later
 * License URI: https://www.gnu.org/licenses/gpl-2.0.html
 * Text Domain: post-ranking
 * Domain Path: /languages
 */
/*
Post Ranking is free software: you can redistribute it and/or modify
it under the terms of the GNU General Public License as published by
the Free Software Foundation, either version 2 of the License, or
any later version.

Post Ranking is distributed in the hope that it will be useful,
but WITHOUT ANY WARRANTY; without even the implied warranty of
MERCHANTABILITY or FITNESS FOR A PARTICULAR PURPOSE. See the
GNU General Public License for more details.

You should have received a copy of the GNU General Public License
along with Post Ranking. If not, see https://www.gnu.org/licenses/gpl-2.0.html.
*/

if (!defined('ABSPATH')) {
  exit; // Exit if accessed directly
}

if (!class_exists('Post_Ranking')) {

  class Post_Ranking
  {
  }
}

// Plugin Instantiation
if (class_exists('Post_Ranking')) {
  // Instatiate the plugin class
  $post_ranking = new Post_Ranking();
}
Let’s create some constants that we will use a lot in this project. Add these codes to our class.
.
.
.

if (!class_exists('Post_Ranking')) {

  class Post_Ranking
  {
    public function __construct()
    {
      $this->define_constants();
    }

    public function define_constants()
    {
      define('POST_RANKING_PATH', plugin_dir_path(__FILE__));
      define('POST_RANKING_URL', plugin_dir_url(__FILE__));
      define('POST_RANKING_VERSION', '1.0.0');
      define('POST_RANKING_POST_VIEW_TABLE_NAME', 'post_views');
    }
  }
}

.
.
.
Create Our Plugin’s Behavior When It’s Activated
There’s no data on WordPress that can shows us how many views for certain post. So we need to create a table to save this data and create a mechanism where if the post is visited, then the view counter for that post will be increased.
We will be using a hook for this purpose. In WordPress, hooks are features that allow developers to customize and extend WordPress functionality without directly editing the core code. So, it’ll be quite convenient for us because we don’t need to read all the WordPress code directly to modify its behavior.
For this case, we will use activation hook, the hook that will be triggered when we activate our plugin on a WordPress website.
First, we need to add a activation function to our plugin’s class. Please add this piece of code to the class.
.
.
.

if (!class_exists('Post_Ranking')) {

  class Post_Ranking
  {
.
.
.
    /**
     * Activate the plugin
     */
    public static function activate()
    {
      update_option('rewrite_rules', '');

      global $wpdb;

      $table_name = $wpdb->prefix . POST_RANKING_POST_VIEW_TABLE_NAME;

      $post_ranking_db_version = get_option('post_ranking_db_version');

      if (empty($post_ranking_db_version)) {
        $query = "
                    CREATE TABLE $table_name (
                        id bigint(20) unsigned NOT NULL AUTO_INCREMENT,
                        post_id bigint(20) NOT NULL default '0',
                        count bigint(20) DEFAULT NULL,
                        KEY id (id)
                    )
                    ENGINE=InnoDB DEFAULT CHARSET=utf8;
                ";

        require_once(ABSPATH . 'wp-admin/includes/upgrade.php');
        dbDelta($query);

        $post_ranking_db_version = POST_RANKING_VERSION;
        add_option('post_ranking_db_version', $post_ranking_db_version);
      }
    }
  }
}

.
.
.
These codes will create a table to save our post views data and save the database version of our plugin when the plugin is activated. The table itself is quite simple, we will have id as the row’s id, post_id as the post’s id, and count as the post view’s counter.
But the function is still not called when we activate our plugin. So, we need to add the function calls to the initiation of the plugin like this:
.
.
.
// Plugin Instantiation
if (class_exists('Post_Ranking')) {

  // Installation and uninstallation hooks
  register_activation_hook(__FILE__, array('Post_Ranking', 'activate'));

  // Instatiate the plugin class
  $post_ranking = new Post_Ranking();
}
The function register_activation_hook will register our activate function to the process of the activation of our plugin.
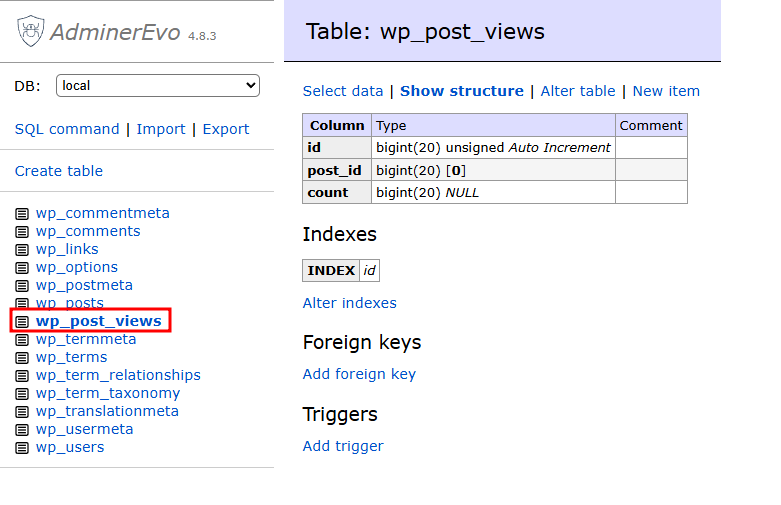
If we activate our plugin, we’ll see new table will be created on our WordPress plugin’s database:
Create Our Plugin’s Behavior When It’s Uninstalled
After creating the behavior for our plugin when it’s installed, we will create the behavior when it’s uninstalled too. What we’ll do when the plugin is uninstalled is to delete the data of database version that saved before and to delete our table.
So, let’s create this function to our Post_Ranking class:
.
.
.
if (!class_exists('Post_Ranking')) {

  class Post_Ranking
  {
.
.
.
    /**
     * Uninstall the plugin
     */
    public static function uninstall()
    {
      delete_option('post_ranking_db_version');

      global $wpdb;

      $table_name = $wpdb->prefix . POST_RANKING_POST_VIEW_TABLE_NAME;

      $wpdb->query($wpdb->prepare(
        "
                    DROP TABLE IF EXIST %s
                ",
        $table_name
      ));
    }
  }
}
.
.
.
And to add the uninstall function of our class to the uninstall process of our plugin. We will add it to the process of initiation of our plugin too like before:
.
.
.
// Plugin Instantiation
if (class_exists('Post_Ranking')) {

  // Installation and uninstallation hooks
  register_activation_hook(__FILE__, array('Post_Ranking', 'activate'));
  register_uninstall_hook(__FILE__, array('Post_Ranking', 'uninstall'));

  // Instatiate the plugin class
  $post_ranking = new Post_Ranking();
}
And if we’re deactivating the plugin now, we will see the version data and the table is deleted.
Counting How Many Views of The Post in Our Website
And now, we will create a logic to fill the data to our wp_post_views table. The first step that we’ll do is to create a function that will increment the number of views of a post if the data exist, but if not, we will create new data to our table first.
Let’s add the function to our Post_Ranking class:
.
.
.
if (!class_exists('Post_Ranking')) {

  class Post_Ranking
  {
.
.
.
    public function add_post_view_count($post)
    {
      global $wpdb;

      $table_name = $wpdb->prefix . POST_RANKING_POST_VIEW_TABLE_NAME;

      $results = $wpdb->get_results("SELECT * FROM $table_name WHERE post_id= '" . $post->ID . "'");

      if ($wpdb->num_rows > 0) {
        $data = array(
          'count' => $results[0]->count + 1
        );

        $wpdb->update($table_name, $data, array(
          'post_id' => $post->ID
        ));
      } else {
        $wpdb->insert(
          $table_name,
          array(
            'post_id' => $post->ID,
            'count'   => 1,
          )
        );
      }
    }
  }
}
.
.
.
We already have the function, but the function is still not called when a post is viewed on our website. So, we will add the function to an action hook named the_post. An action hook is a hook that let you do something at certain predefined points in the WordPress runtime. And the the_post action hook is an action hook that let the developers to modify the post object immediately after being queried or setup. Since we’re not modify the post, we will just utilize that it will be called when the post is being queried.
To add the function that we just created to the action hook, we need to add the action hook calls at the __construct function of our Post_Ranking class, so it will be called when we initialize the class:
.
.
.
if (!class_exists('Post_Ranking')) {
class Post_Ranking
{
public function __construct()
{
$this->define_constants();
add_action('the_post', array($this, 'add_post_view_count'), 999);
}
.
.
.
}
}
.
.
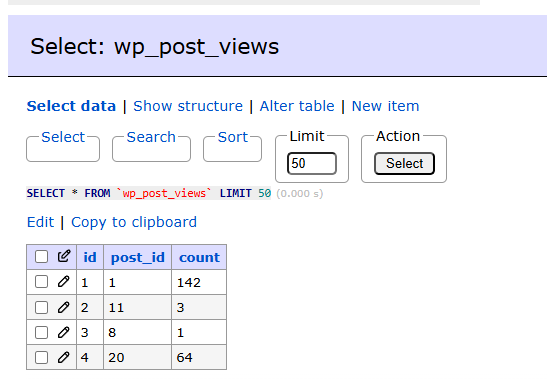
.And after we activate our plugin, then see some post on our website, we can see there’ll be some new row created to our table:
But we still need to sort it and present the data to our user so they can see which post that is most popular. To do that, we’ll create a widget class for our plugin and create a view for that widget too.
Creating the Plugin’s Widget
Now, we will create a widget for our plugin. The first thing that we must do is create a Widget class. The class will extend the WP_Widget class. The class will be placed on the widgets directory with file name class.post-ranking-widget.php like this:
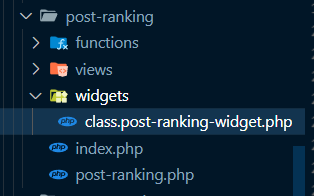
And inside that file, we’ll create a class named as Post_Ranking_Widget as our Widget class.
<?php
if (!class_exists('Post_Ranking_Widget')) {
  class Post_Ranking_Widget extends WP_Widget
  {
  }
}
Then, let’s add description and action that’ll register our widget to the WordPress:
<?php
if (!class_exists('Post_Ranking_Widget')) {
  class Post_Ranking_Widget extends WP_Widget
  {
    public function __construct()
    {
      $widget_options = array(
        'description' => __('Your post ranking widgets', 'post-ranking')
      );

      parent::__construct(
        'post-ranking',
        'Post Ranking',
        $widget_options,
      );

      add_action(
        'widgets_init',
        function () {
          register_widget(
            'Post_Ranking_Widget'
          );
        }
      );
    }
  }
}
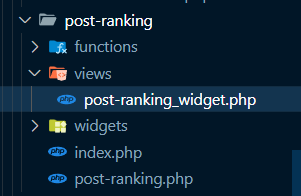
And to show our widget to the website, we need HTML file to construct how our widget looks like. So let’s create a HTML file for this purpose that we’ll name as post-ranking_widget.php and place it at views directory like this:
And fill the file with these codes:
<?php
require_once(POST_RANKING_PATH . 'functions/functions.php');
$posts = post_ranking_get_posts();
$index = 1;

foreach ($posts as $post) {
?>
  <div class="post-ranking-item">
    <a href="<?= esc_url(get_permalink($post)) ?>">
      <?= $index ?>. <?= $post->post_title ?>
    </a>
  </div>
<?php

  $index++;
}
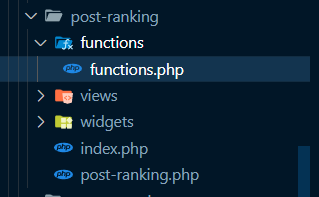
The code will get the posts from post_ranking_get_posts function, loop through the array of posts, and create link for each post. But we still don’t have the post_ranking_get_posts function, so let’s create it on separate file functions.php at functions directory:
And fill the file with this code:
<?php

if (!function_exists('post_ranking_get_posts')) {
  function post_ranking_get_posts()
  {
    global $wpdb;

    $table_name = $wpdb->prefix . POST_RANKING_POST_VIEW_TABLE_NAME;

    $results = $wpdb->get_results("SELECT * FROM $table_name ORDER BY count DESC LIMIT 10");
    $posts = [];


    foreach ($results as $result) {
      $posts[] = get_post($result->post_id);
    }

    return  $posts;
  }
}
At that function, we query the data that we needed from our wp_post_views table, sort it by how many views, and limit the data to 10.
But the code on post-ranking_widget.php file still not included in our Widget class. For this purpose, we’ll using widget function on our Widget class, this function has a responsibility to echoes the widget content. So, let’s get back to our Post_Ranking_Widget and add this function:
<?php
if (!class_exists('Post_Ranking_Widget')) {
  class Post_Ranking_Widget extends WP_Widget
  {
.
.
.
    public function widget($args, $instance)
    {
      $title = 'Post Ranking';

      echo $args['before_title'] . $title . $args['after_title'];
      require(POST_RANKING_PATH . 'views/post-ranking_widget.php');
    }
  }
}
We’re adding $args['before_title'] and $args['after_title'] so if there’s special formatting on our theme, it will be included on our title too.
And finally, let’s add the widget function to our Post_Ranking class. We can add the code to initiate the widget to the __construct function of our Post_Ranking class like this:
.
.
.
if (!class_exists('Post_Ranking')) {

  class Post_Ranking
  {

    public function __construct()
    {
.
.
.
      require_once(POST_RANKING_PATH . 'widgets/class.post-ranking-widget.php');
      $PostRankingWidget = new Post_Ranking_Widget;
    }
.
.
.
  }
}
And now we place the widget to our website after we activate our plugin.
Show The Widget to The World
After activating the plugin, we still need to place where to put our widget on our website. It will be quite related with the theme that you used for your WordPress website. As example for this article, I’m using Twenty Twenty theme.

Then, open the Widgets submenu on the Appearance menu, and add our widget to the Footer #1 part of our website page.
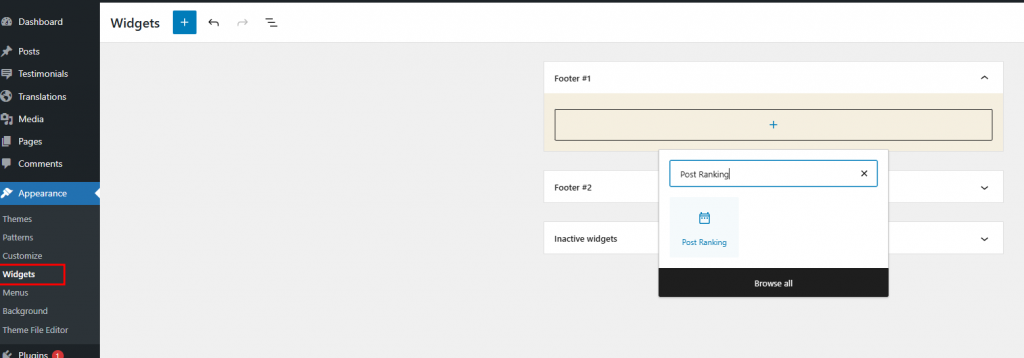
Then, let’s update our configuration for the widgets.
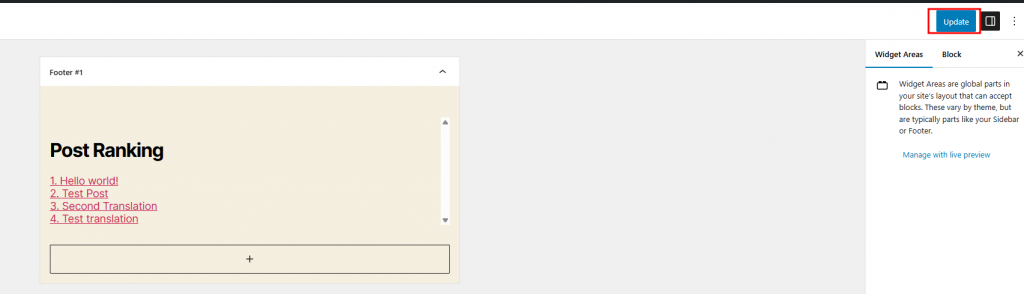
And now we can see our widget is displayed on our WordPress page. Congratulations!!!
And you can see the original code here.
If you have any questions, don’t hesitate to comment or contact me on LinkedIn, thank you!
Leave a Reply